Showing posts with label animation. Show all posts

Sunday, 12 July 2015

Mapping the Polycentric Metropolis: journeys to work in the Bay Area

I’ve recently been writing and thinking about polycentric urban regions, partly because I’m interested in how places connect (or not) for one of my research projects, and partly because I’ve been experimenting with ways to map the connections between places in polycentric urban regions. There was quite a lot of the latter in Peter Hall and Kathy Pain’s ‘The Polycentric Metropolis’ from 2006 but given that the technology has moved on a little since then I thought I’d explore the topic in more detail. Mind you, I’ve also been looking back on Volumes 1 to 3 of the Chicago Area Transportation Study of 1959 as a reminder that technology hasn’t moved on as much as we think – their ‘Cartographatron’ was capable of mapping over 10 million commuting flows even then (though it was the size of a small house and required a team of technicians to operate it – see bottom of post for a photo).

Are you part of the big blue blob?

Anyway, to the point… What’s the best way of mapping polycentricity in an urban region? For this, I decided to look at the San Francisco Bay Area since it has been the subject of a few studies by one of my favourite scholars, Prof Robert Cervero of UC Berkeley. Also, a paper by Melanie Rapino and Alison Fields of the US Census Bureau identified the Bay Area as the region with the highest percentage of ‘mega commuting’ in the United States (traveling 90 or more minutes and 50 or more miles to work). Therefore, I decided to look at commuting flows between census tracts in the 9 counties of the Bay Area, from Sonoma County in the north to Santa Clara County in the south. I’ve used a cut-off of 30 miles here instead of the more generous 50 mile cut-off used by Rapino and Fields. I also mapped the whole of the United States in this way, but that’s for another day.

The series of maps below illustrate both patterns of commuting in the Bay Area and the different approaches I’ve taken in an attempt to capture the essence of polycentrism in the area. I don’t attempt to capture the misery of some of these commutes, since for that I’d need a different kind of technology. But, I do think the animations in particular capture the polycentric nature of commuter flows. If you’re represented by one of the dots in the images below, thanks a lot for taking part!

Let’s start with a simple representation of commutes of over 30 miles from San Francisco County (which is coterminous with the City of San Francisco). The animated gif is shown below and you can click the links to view the sharper video file (mp4) in your browser (so long as you're on a modern browser). The most noticeable thing here is the big blue blob© making its way down from San Francisco to Palo Alto, Mountain View and Cupertino in Santa Clara County. In total, the blue dots represent just over 15,000 commuters going to 803 different destination census tracts. I’m going to take a wild guess and suggest that some of these commutes are by people who work at Stanford, Google and Apple. But it probably also includes people working at NASA Ames Research Center, Santa Clara University and locations in San Jose. 

View video file in browser - or click image to enlarge gif


These patterns aren’t particularly surprising, since there has been a lot of press coverage about San Francisco’s bus wars and commutes of this kind. However, there is a fairly significant dispersal of San Francisco commuters north and east, even if the numbers don’t match those of the big blue blob. By the way, from San Francisco it's about 33 miles to Palo Alto, 39 miles to Mountain View, 42 to Cupertino and 48 to San Jose. 

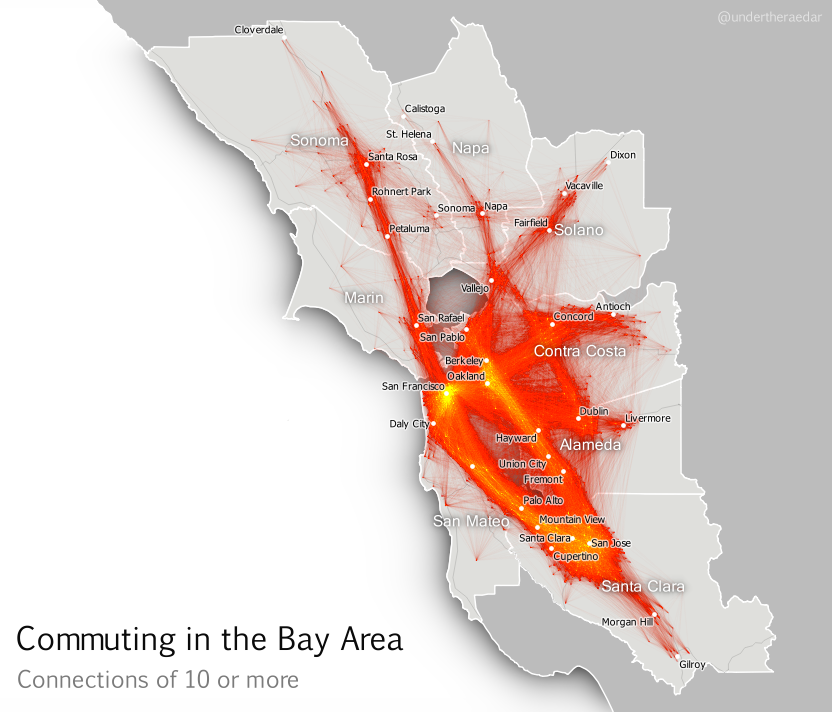
The first example above doesn’t reveal anything like the whole story, though. There are actually quite a lot of commuters who travel in the opposite direction from Santa Clara County to San Francisco but more widely the commuting patterns in the Bay Area – a metro area of around 7.5 million people – resembles a nexus of mega-commuting. This is what I’ve attempted to show below, for all tract-to-tract connections of 10 people or more, and no distance cut-off. The point is not to attempt to display all individual lines, though you can see some. I’m attempting to convey the general nature of connectivity (with the lines) and the intensity of commuting in some areas (the orange and yellow glowing areas). Even when you look at tract-to-tract connections of 50 or more, the nexus looks similar.

Click image to view larger version

Stronger connections - click image to view larger version


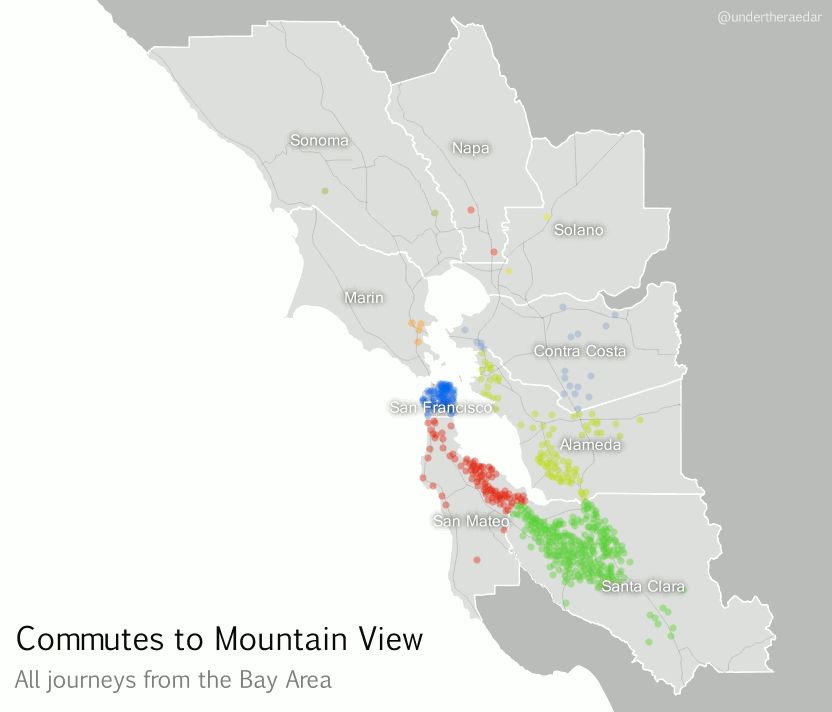
If we zoom in on a particular location, using a kind of ‘spider diagram’ of commuting interactions, we can see the relationships between one commuter destination and its range of origins. In the example below I’ve taken the census tract where the Googleplex is located and looked at all Bay Area Commutes which terminate there, regardless of distance. In the language of the seminal Chicago Area Transportation Study I mentioned above, these are ‘desire lines’ since this represents ‘the shortest line between origin and destination, and expresses the way a person would like to go, if such a way were available’ (CATS, 1959, p. 39) instead of, for example, sitting in traffic on US Route 101 for 90 minutes. According to the data, this example includes just over 23,000 commuters from 585 different locations across the Bay Area. I've also done an animated line version and a point version, just for comparison.

Commuting connections for the Googleplex census tract

Animated spider diagram of flows to Mountain View

Just some Googlers going to work (probably) mp4


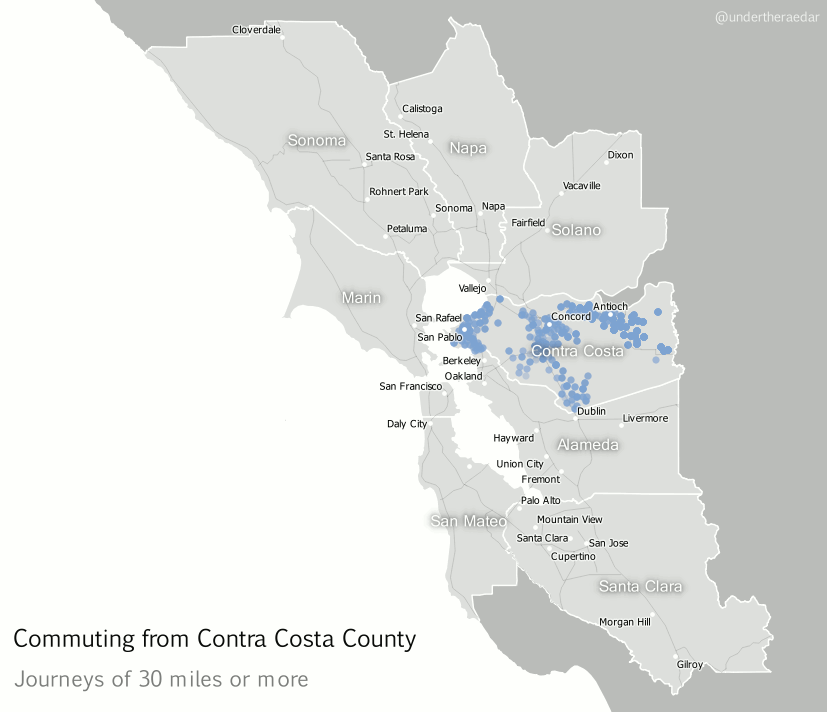
Looking further afield now, to different parts of the Bay Area, I also produced animated dot maps of commutes of 30 miles or more for the other three most populous counties – Alameda, Contra Costa and Santa Clara. I think these examples do a good job of demonstrating the polycentric nature of commuting in this area since the points disperse far and wide to multiple centres. Note that I decided to make the dots return to their point of origin – after a slight delay – in order to highlight the fact that commuting is a two way process. The Alameda County animation represents over 12,000 commuters, going to 751 destinations, Contra Costa 25,000 and 1,351, and Santa Clara nearly 28,000 commuters and 1,561 destinations. The totals for within the Bay Area are about 3.3 million and 110,000 origin-destination links.

Alameda County commutes of 30+ miles mp4


Contra Costa County commutes of 30+ miles mp4


Santa Clara County commutes of 30+ miles mp4


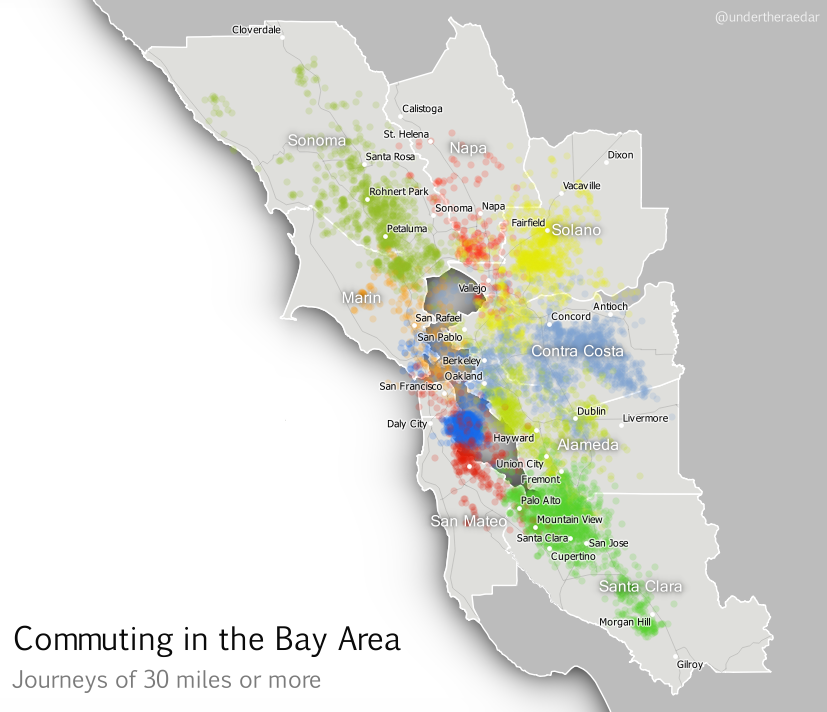
Finally, I’ve attempted something which is a bit much for one map, but here it is anyway; an animated dot map of all tract-to-tract flows of 30 or more miles in the Bay Area, with dots coloured by the county of origin. Although this gets pretty crazy half way through I think the mixing of the colours does actually tell its own story of polycentric urbanism. For this final animation I’ve added a little audio into the video file as well, just for fun.

A still from the final animation - view here

What am I trying to convey with the final animation? Like I said, it's too much for a single map animation but it's kind of a metaphor for the messy chaos of Bay Area commuting (yes, let's go with that). You can make more sense of it if you watch it over a few times and use the controls to pause it. It starts well and ends well, but the bits in the middle are pretty ugly - just like the Bay Area commute, like I said.

My attempts to understand the functional nature of polycentric urbanism continue, and I attempt to borrow from pioneers like Waldo Tobler and the authors of the Chicago Area Transportation Study. This is just a little map-based experimentation in an attempt to bring the polycentric metropolis to life, for a region plagued by gruesome commutes. It’s little wonder, therefore, that a recent poll suggested Bay Area commuters were in favour of improving public transit. If you're interested in understanding more about the Bay Area's housing and transit problems, I suggest watching this Google Talk from Egon Terplan (54:44).


Notes: the data I used for this are the 2006-2010 5-year ACS tract-to-tract commuting file, published in 2013. Patterns may have changed a little since then, but I suspect they are very similar today, possibly with more congestion. There are severe data warnings associated with individual tract-to-tract flows from the ACS data but at the aggregate level they provide a good overview of local connectivity. I used QGIS to map the flows. I actually mapped the entire United States this way, but that’s going into an academic journal (I hope). I used Michael Minn’s MMQGIS extension in QGIS to produce the animation frames and then I patched them together in GIMP (gifs) and Camtasia (for the mp4s), with IrfanView doing a little bit as well (batch renaming for reversing file order). Not quite a 100% open source workflow but that’s because I just had Camtasia handy. The images are low res and only really good for screen. If you’re looking for higher resolution images, get in touch. It was Ebru Sener who gave me the idea to make the dots go back to their original location. I think this makes more sense for commuting data.

The Cartographatron: Information and images on the 'Cartographatron' used in the Chicago Area Transportation Study (1959) are shown below.


From p.39 of CATS, 1959, Vol 1


From p.98 of CATS, 1959, Vol 1


Tuesday, 23 December 2014

Simple Animations with QGIS - A Long Tutorial

This rather long post explains how you can make images and animations like the ones below using only open source software (mostly QGIS) and open data. I've just used flights from Hartsfield-Jackson International Airport in Atlanta because it's the busiest airport in the world and serves a wide variety of destinations. The methods are relatively straightforward but it does take time to get your head around if you're new to the software and the data. If you're already a competent QGIS user it should be pretty easy. Once you've got the method nailed down you can apply it to all kinds of different scenarios and datasets. First of all, though, here's a static image of outbound flights from ATL projected onto a globe.

Flight destinations from Atlanta (full size)

The first thing you'll need to do is get some data. In this example I've taken some general country boundaries from Natural Earth and for the flights data I've used the OpenFlights dataset. I then created an azimuthal orthographic projection centred on Hartsfield-Jackson International Airport in Atlanta. Hamish Campbell already wrote an excellent tutorial on how to do this in QGIS, so just follow that if you want to use a projection that makes your country layer appear as if it were on a globe. The only extra tips you'll perhaps need to replicate Hamish's method are as follows. To get the lat/long of a place you want to centre your projection on, just search for it on Google Maps and then look in the address bar for the coordinates. The python script on Hamish's page just needs to be copied and pasted into a text document, saved with a .py extension and then placed in the correct folder on your computer (on a PC with QGIS 2.4 it would be something like this: C:\Program Files\QGIS Chugiak\bin). Also, when you clip the layer to a global projection, QGIS will create a clip circle and a new clipped layer. These may not appear at all or if they do they'll maybe be very blocky. If so, go to the properties for the layer in QGIS and on the Rendering tab just untick 'Simplify Geometries'. I normally save new copies of these layers using Save As... from each layer.

A faster animated version of ATL outbound flights (big)

That should be your global projection sorted. You can then apply it via the Project menu in QGIS and then Project Properties... CRS and then 'Project on the fly' as in the tutorial.  To achieve some of the visual effects above, I just duplicated the clipped circle layer (you'll have to Save As... from the temp clipped layer to do this) and applied an inverted polygon style and a shapeburst fill with a blue to black gradient (Nyall Dawson did a great blog post on this, which you might find useful). I also did a similar thing with the land layer, just to make some of the smaller islands stand out. You'll also need to make the outline colour the same as the fill colour in the circle to avoid a line appearing through your earth.

A very slow version, with a pause at the end (big)

So far, so good. But what about the flight paths and animated dots? Well, to create the lines you can follow my blog post on flow mapping in QGIS and use the sample dataset I posted there. You'll need to calculate two new columns for this shapefile (see below) and use the MMQGIS plugin for QGIS (installed, as ever, via the Plugins menu). If you just add this file to your global azimuthal orthographic projection there will be so many lines and it may take a long time to display so there are a few intermediate steps I'd recommend... 

1. Open the new global flights dataset in a blank QGIS project using the default projection and then remove duplicate lines using Modify, Delete Duplicate Geometries in the MMQGIS plugin. Many routes (e.g. JFK-LHR) are served by multiple airlines and I wanted to only show origins and destinations. This also makes the file much smaller. 2. Although the flight connections would appear as straight lines on our global projection, I like them to look a little curved; partly for effect and partly to bring out the curvature of the earth but also because flight paths are not straight lines in reality. So, once I've removed duplicates I then 'densify' the lines in QGIS by adding in 50 intermediate vertices - done via Vector, Geometry Tools, Densify polygons in QGIS. 3. I then added this new flights layer to my ATL-based global projection and I clipped the layer using the Hamish Campbell method, and saving the resulting layer as a new shapefile. You should now have a globe centred on the location of your choice, plus some nice curved airline flight paths.

Same as above, but with labels and pause at end (big)

For the next stage, the way I did it was to open the dbf part of the new flight paths shapefile in Excel and then calculate an 'offset' lat and long column which I could use to animate the dots. You just need to read the Animate Columns part of Michael Minn's MMQGIS page to understand this. Once you've calculated the new lat/long offset columns you can save the csv. Once you've done this, import the csv into QGIS using the Add Delimited Text Layer (comma icon), using the airport origin lat/long as the x,y coordinates in the import dialogue. Filter the new layer so it only shows ATL origins and you'll just see one dot for ATL but actually there are many dots in the same location as they all have the same origin lat/long. Save the filtered layer as a new shapefile and then run the Animate Columns tool in MMQGIS using the appropriate fields and the number of animation frames you want (50 works well with this example). An important point here is that you need to make sure your QGIS window is quite small as the extracted image frames will be the same size as your QGIS map frame and if it's too big it will make a massive GIF.

You now have all you need to create an animation. There are many ways to create an animated GIF, but using GIMP is very simple. You can download this free, open source image manipulation programme in a few minutes. You then just need to go to File, Open as Layers and then select all the frames you just created in QGIS and GIMP will add them to the project and they'll appear in the Layers pane. You don't need to reorder them as they are numbered correctly from the MMQGIS export. From here you can go to File, Export and then select the GIF file format and use the animation options here. Try 50 milliseconds between frames as with 50 frames this will create a nice short 2.5 second animation that isn't too slow. You should use Filters, Animation, Optimize for GIF and then export from that window if you want a much smaller file size. I created another one of these visuals, centred on LHR and showing flows from JFK, LHR and PEK.

Same techniques, different data (and also a bit crazy)

That's quite a lot of information and quite a few steps but if you try this and still can't make it work feel free to get in touch via twitter or e-mail. Why would you want to do this? I'll leave that up to anyone who wants to try it but displaying movements of people and goods is relevant across a number of disciplines so hopefully some will find this useful.


Other tips and information: depending upon which location you're choosing, some of your lines or dots might be going the wrong way round the earth but you can fix this with a bit of simple maths in the offset calculation. In GIMP, you can add a different frame duration by adding a number and then ms to the layer info - e.g. 1000ms - so that it creates a pause effect, as in the examples above. I created an ATL point and a destination airports points layer from the imported csv so that I could manually create a couple of extra frames to add in to the end of my animation. One to show destinatinon airport names and the other just to label ATL. For the glow effect in the flow lines in the static image I used the Feature Blend 'addition' option in layer properties in QGIS. 

Acknowledgements: As ever, I've borrowed ideas and techniques from other QGIS users, including Hamish Campbell, Nyall Dawson, Nathan Woodrow. I decided to have a look at this after an e-mail exchange with Waldo Tobler about migration data. Thanks of course to the excellent OpenFlights team who make their data available under an Open Database Licence.

Tuesday, 24 April 2012

London's 100 Poorest Areas

The theme for this post follows on from some work I did recently which looked at the increasing level of deprivation in Outer London, as reported in the Guardian a couple of weeks ago - see also the maps on the Guardian datablog. It's true that housing market pressures (among other things) are helping to push poverty away from Inner London but the majority of London's poorest are still within the inner city, and Tower Hamlets, Hackney and Newham in particular. In order to provide a clearer picture of where exactly the very poorest (most deprived) areas are, I produced a map and animation of London's 100 most deprived areas. 


The results are not at all surprising. Of the 100 most deprived LSOAs in London, according to the 2010 Indices of Deprivation, the Borough with the most areas is Tower Hamlets (18), followed by Hackney (17), Newham (13), Haringey (12) and Brent (10). Deprivation is increasing in Outer London relative to the past and I was particularly taken today by the news that Newham Council were looking to re-house poorer residents in Stoke (more than 150 miles away). That's taking the suburbanisation of poverty a bit far! 

Some work I did with Ed Ferrari last year looked at residential mobility patterns amongst the richest and poorest sectors of the population in England. What we found surprised us at the time. Our analysis showed that it was often the poorest areas which were associated with the longest residential moves. We didn't have enough fine-grained data to make more of this but it was an interesting insight into what might be happening more broadly.

Taking the 100 most deprived locations is of course arbitrary but the point here is that despite debates about whether 'the poor' should live in 'rich areas' the fact is that many of the poorest people living in London are in areas which in recent years have changed considerably so that they are now experiencing very high demand, inflated rents and severe socio-economic inequalities. This represents an intensification of existing processes rather than something entirely new but it does mean that policy makers need to think carefully about what to do about it...

Tuesday, 29 November 2011

NEETs in England, 2000 to 2011 (Animated Chart)

The news last week that the number of 16 to 24 year olds in England not in education, employment or training (NEET) reached an all-time high was widely covered, and quite shocking since there are now 1.16 million 16 to 24 year olds in this category. I thought it might be quite interesting to look at the data more closely to see how it compares to other time periods. The Department for Education publish the NEET data on a quarterly basis and the most recent data are for the third quarter of 2011 at the regional level. "What would the quarterly data look like in an animated bar chart?", I hear you say. Click the image below to find out!


I should say that you'll need to watch the clip a few times in order to make sense of it (and use the pause button), but once you get your head round it, it tells an interesting story (it also dances a bit like an equalizer on an old stereo). The lowest NEET total for England was in the second quarter of 2000 (629,000) and the highest total comes from the third quarter of 2011 (1,163,000). The highest regional percentage figure for NEETs was in the third quarter of 2011 in the North West (23.9%) and the lowest was in the last quarter of 2003 and the first quarter of 2004 in the South West (7.4%).

Lots of interesting stories here but the most striking thing is the total number of NEETs in England. 

Note: I created this using Google's motion charts and recorded it using Camtasia.

Sunday, 27 March 2011

English Indices of Deprivation 2010 - A North-South Divide?

I've been looking at the new Indices of Deprivation a bit more since my last post. Despite the headline-grabbing fact that England's most deprived area is in Essex - in the south of England - the overall patterns remain dominated by the North. This map highlights the least and most deprived areas in England and also notes some important exceptions (click map for full size image)...


I've also put together an animation showing the 1%, 2%, 3%, etc. most deprived areas all the way up to the 10% most deprived - and then the 10% least deprived (as in the map above) in order to demonstrate the general north-south divide. Notice how the cities of Liverpool and Manchester in particular dominate these patterns. If you want to control the animation, you can hit pause then move the slider along the time bar yourself (the video may take a moment to load).

Unable to display content. Adobe Flash is required.

This version is just a small blog size version - I've also posted a larger version on my University of Sheffield pages. So, in contrast to the headlines, it seems clear that deprivation remains more firmly entrenched in the north than in the south (with some exceptions of course).

Tuesday, 30 November 2010

Experiments in Colour

I've been experimenting with colour and animations a lot recently. This involves producing a lot of material that ends up on the floor of the editing room, so to speak. So, I made an entirely pointless animation of said cuttings... The one below is an animated gif (nerd speak) of the North West of England and its commuting 'intensity' (i.e. spikes for areas where people commute to). The visual effects are just from my experiments - some just for the sake of art. An assault on the eyeballs, to be sure!


Sunday, 7 March 2010

Visualising London Population Growth

Update, 7 June 2011 - See bottom of post for a new animation...

Following the theme of the last post - and the last series of posts with video content and animations, this is a short post on the development of London's population, by Borough, from 1801 to 2001. The data is, of course, Crown Copyright - and I downloaded the files from here, in case you want to know. There are a lot of data here, so how to make sense of it? First of all, an animated bar chart sequence, with the original 1963 Inner London Boroughs (i.e. not the ONS definition) in red and the Outer London Boroughs in blue...

Unable to display content. Adobe Flash is required.
You can see it in full size here, to enable reading of label names.

The next experiment in visualizing this data was to convert it into a Google motion chart. The results of this are shown below. You can start the graphics by hitting the play button and you can query them by hovering over any of the coloured bubbles. To label a bubble, just click it. It's a bit small here but this is just for illustration. Experiment with the tabs at the top of the initial chart to see the data in a different format. There's lots of options for experimenting here...


Finally, a view of what all this looks like spatially, in 3D.

Unable to display content. Adobe Flash is required.

As for the data itself, you can discover a lot from these visualizations, but the high point in population for a London Borough was Tower Hamlets in 1901, with 597,000 and the low point was in Brent with 2,000 in 1801 and 1811.

Postscript, 7 June 2011. I've since done a proper London animation for the Centre for Cities. A small version is shown below. For the full version, check this link.

Unable to display content. Adobe Flash is required.